

Why You’ll Love This Chocolate Mug Cake
Craving chocolate but don’t want to bake a whole cake? You’re in the right place.
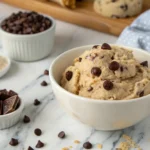
This chocolate mug cake is rich, moist, and dangerously easy to make. With just a handful of pantry staples and a microwave, you can go from “I need dessert now” to digging into warm, gooey chocolate goodness in under 5 minutes. No fancy equipment. No baking degree required.
Whether you’re curled up on the couch watching Netflix or need a midnight sweet fix, this single-serve chocolate treat is the answer. I’ve tested this recipe to perfection—so it’s never dry, never rubbery, and always hits the spot.
Looking for inspiration? Try this other delicious treat like Creamy Cottage Cheese Chocolate Mousse.
Let’s break down everything you need to know to make the best mug cake ever—from ingredients to texture tricks and custom topping ideas.
Ingredients for Chocolate Mug Cake

Simple Pantry Staples You’ll Need
You’ll be happy to know this microwave chocolate cake calls for just a few everyday items you probably already have in your kitchen. No eggs, no fancy baking powders—just real, simple ingredients:
- All-purpose flour – Gives the cake structure
- Unsweetened cocoa powder – Delivers rich, deep chocolate flavor without added sugar
- Granulated sugar – Sweetens and helps tenderize
- Baking soda – Gives a bit of lift
- Salt – Enhances flavor
- Milk – I use whole milk, but dairy-free milk (like oat or almond) works too
- Neutral oil – Like canola or vegetable oil for moistness
- Vanilla extract – Adds that warm, bakery-style flavor
- Optional: Chocolate chips or chopped chocolate – For gooey melt-in-your-mouth bits
This combo delivers a cake that’s fluffy, rich, and not too sweet.
Pro tip: Want it extra indulgent? Add a spoonful of nut butter or a sprinkle of instant espresso powder to deepen the chocolate flavor.
Ingredient Notes & Optional Add-Ins
Let’s be real—mug cakes are a vibe, and you should feel free to customize:
- Milk alternatives: Almond, oat, soy, or coconut all work great
- Sweeteners: Try coconut sugar or maple syrup (just adjust the dry ingredients)
- Gluten-free: Use a 1:1 gluten-free flour blend—results are still light and moist
- Add-ins: Crushed walnuts, peanut butter chips, shredded coconut, or even a dash of cinnamon
You can also turn this into a vegan chocolate mug cake with just two swaps (we’ll break that down).
This base is super versatile—and it’s all about comfort food that fits your lifestyle.
How to Make Chocolate Mug Cake (Step-by-Step Instructions)
Mix, Microwave, and Enjoy: 5-Minute Method
Let’s keep it simple and delicious. You don’t need a mixer, bowls, or baking pans—just a mug, a fork, and a microwave. Here’s how to make the best chocolate mug cake from scratch in minutes.
Step-by-Step Instructions:
Step 1: Grab the right mug
Use a microwave-safe mug that’s at least 12 ounces in size. You want enough room for the cake to rise without spilling over.
Step 2: Mix dry ingredients
Add directly into the mug:
- 4 tbsp all-purpose flour
- 2 tbsp unsweetened cocoa powder
- 2 tbsp granulated sugar
- 1/8 tsp baking soda
- Pinch of salt
Stir with a fork to combine.
Step 3: Add wet ingredients
Now pour in:
- 3 tbsp milk (dairy or plant-based)
- 2 tbsp neutral oil
- 1/4 tsp vanilla extract
Stir until the mixture is smooth and no dry pockets remain.
Optional: Fold in 1 tbsp chocolate chips for extra gooeyness.
Step 4: Microwave
Center the mug in the microwave and heat on high for 60 to 75 seconds.
Microwave wattage varies, so check at 60 seconds. The cake should look set on top but still slightly moist in the center.
Step 5: Let it cool (just a little)
Give it 1–2 minutes to rest. It’ll continue cooking and firming up while cooling. Then, grab a spoon and dive in!
Looking to level it up? Top it with a scoop of vanilla ice cream or a spoonful of whipped cream.
This is what fast comfort food is all about—easy, rich, and perfectly portioned.
Visual Clues Your Mug Cake Is Perfectly Cooked
Not sure if your mug cake is done? Here’s what to look for:
| Sign | What It Means |
|---|---|
| Cake rises above mug rim | It’s cooked and fluffy |
| Top looks matte & springy | Perfect doneness, not overcooked |
| Still gooey at center | Great if you like it molten-style |
| Wet batter on top | Needs another 10–15 seconds in microwave |
Microwave ovens vary widely in strength. If yours runs hot, start with 60 seconds. If it’s lower wattage, 75 to 90 seconds may be perfect. Once you get a feel for it, this dessert becomes your no-fail chocolate fix.
Tips for the Best Texture and Flavor
Common Mistakes to Avoid
Even though this recipe is ultra-simple, there are a few easy missteps that can leave you with a dense or rubbery mug cake. Let’s save you from that. Here are the top things NOT to do:
1. Over-mixing the batter
Stir until just combined. Over-mixing can activate too much gluten, which makes the cake tough instead of tender.
2. Using too small of a mug
If your mug is under 12 oz, your cake might overflow. Messy microwave, sad dessert. Avoid it.
3. Overcooking
This is the most common issue. Mug cakes cook quickly—like, really quickly. Even an extra 15 seconds can turn a moist cake into a sponge.
4. Using cold ingredients straight from the fridge
Cold milk or cold oil can make the batter harder to mix and may cook unevenly. Let your milk and oil come to room temp if you can.
5. Skipping the salt
Even a pinch of salt is crucial—it balances the sweet and amplifies the chocolate flavor.
Baking is science, but mug cakes are also art. Once you get a feel for it, you’ll never need to buy pre-packaged desserts again.
Mug Size, Microwaves, and Timing Explained
Mug Size Matters:
The perfect mug for this cake is at least 12 oz, wide, and tall. A straight-sided mug works better than a bowl-like one, as it helps the cake rise properly and cook evenly.
Microwave Wattage Check:
Most microwaves today fall between 900 and 1200 watts. Use this quick guide:
| Microwave Wattage | Cooking Time |
|---|---|
| 1200 watts | 60–65 sec |
| 1000 watts | 70 sec |
| 900 watts | 75–90 sec |
If you’re unsure, start low—you can always add 10-second bursts. Once you overcook it, there’s no going back.
How to Know It’s Done:
- Surface should look dry and slightly springy
- Cake will puff up but settle a little as it cools
- Stick a toothpick in if you’re unsure—some moist crumbs = perfect
Want even more flavor? Try a splash of espresso or cinnamon in the batter, or a sprinkle of flaky sea salt on top after microwaving. These small tweaks can turn your mug cake into a restaurant-style dessert.
Flavor Variations & Toppings

Fun Mix-ins: Chocolate Chips, Peanut Butter, and More
One of the best things about a microwave chocolate mug cake is how customizable it is. You can turn the base recipe into an entirely different experience with just a few easy mix-ins—no extra pans or prep needed.
Try adding one (or more!) of these flavor-boosting ingredients right into the batter before microwaving:
- Chocolate chips – Classic gooey pockets of melted chocolate
- Peanut butter – Swirl in 1 tablespoon for a nutty twist
- Mini marshmallows – Melt into sweet, sticky bites
- Crushed Oreos – Fold in 1–2 crushed cookies for texture
- Shredded coconut – Adds subtle sweetness and chew
- Instant espresso powder – Deepens the chocolate flavor
- A pinch of cinnamon or chili powder – For a Mexican hot chocolate vibe
- Chopped nuts – Walnuts, almonds, or pecans for crunch
Keep in mind: Don’t go overboard. Too many add-ins can change the cook time or weigh down the cake. Stick to about 2 tablespoons total for mix-ins.
Fun tip: Drop a square of dark chocolate or a teaspoon of peanut butter right in the center of the batter before microwaving. You’ll get a surprise molten center!
If you want a little more indulgence, pair your mug cake with a side of Easy Peach Cobbler Recipe for a dessert duo you won’t forget.
Creative Toppings to Elevate Your Mug Cake Game
Once your cake is hot and ready, it’s topping time. This is where you get to take your dessert from “yum” to wow-worthy. Whether you’re eating solo or serving to impress, these ideas never fail:
- Scoop of ice cream – Vanilla, salted caramel, or even chocolate-on-chocolate
- Whipped cream – Store-bought or homemade, both do the trick
- Chocolate syrup or caramel drizzle – For a decadent dessert finish
- Fresh berries – Strawberries, raspberries, or banana slices
- Crushed pretzels – Sweet + salty combo
- Dusting of powdered sugar or cocoa powder – Always classic
- Dairy-free coconut whip – For a plant-based finish
Remember: A mug cake is your blank canvas. Whether you keep it classic or go all-out with toppings, this single-serve dessert is always a winner.
Dietary Swaps – Vegan, Gluten-Free & Dairy-Free Options

Make It Vegan Without Losing Moisture
Whether you’re plant-based full-time or just out of eggs, this recipe is naturally egg-free—which is already a win. But to go fully vegan, all you need are two quick swaps:
- Use a plant-based milk – Almond, oat, soy, or coconut milk all work well. Just make sure it’s unsweetened if you want to control the sweetness.
- Choose a neutral plant-based oil – Canola or sunflower oil keeps the cake moist and neutral in flavor.
Bonus: Add 1/2 tablespoon of dairy-free chocolate chips or a square of dark chocolate (most are vegan-friendly) to take things up a notch.
The result? A vegan chocolate mug cake that’s every bit as moist, rich, and satisfying as the original.
Easy Gluten-Free Adjustments That Work
If you’re skipping gluten, don’t worry—this recipe still works beautifully. You can create a gluten-free chocolate mug cake with minimal effort.
Here’s how:
- Use a 1:1 gluten-free flour blend – Look for one labeled as a baking blend with xanthan gum included.
- Avoid oat flour or coconut flour alone – These flours absorb moisture differently and will throw off the texture unless you rebalance the whole recipe.
The bake time stays the same, and the texture remains soft and cakey with the right flour swap.
Need Dairy-Free? You’ve Got Options
This cake is super flexible, and skipping dairy is easy:
- Milk: Replace dairy milk with oat milk, soy milk, almond milk, or rice milk.
- Toppings: Go for coconut whipped cream, dairy-free ice cream, or simply enjoy it warm and plain.
Pro tip: Oat milk gives the creamiest texture if you want a dairy-free chocolate mug cake that still feels rich and indulgent.
Whatever your needs, this mug cake can flex to fit. That’s the beauty of a custom single-serve dessert—you control what goes in.
Storage & Reheating (If You Ever Have Leftovers!)
Can You Store a Mug Cake?
Honestly, this dessert is so good you probably won’t have leftovers—but hey, life happens. Maybe you’re prepping ahead or doubling up. Either way, yes, you can store chocolate mug cake, and it holds up surprisingly well for a quick dessert.
Here’s how:
- Cool completely before storing. Warm mug cake in a sealed container will trap moisture and turn soggy.
- Place in an airtight container or wrap the mug securely with plastic wrap.
- Refrigerate for up to 2 days.
If you’re prepping for guests or making a late-night stash (respect), mug cakes store better when made slightly undercooked—so they stay moist when reheated.
How to Reheat Without Drying It Out
The key to reheating is not overdoing it. Mug cakes dry out fast in the microwave if you’re not careful. Follow these steps to keep things soft and satisfying:
- Microwave on medium or 50% power for 10–15 seconds.
- Cover loosely with a microwave-safe lid or paper towel to hold in moisture.
- Avoid reheating more than once. Reheated cake doesn’t get better with each round.
Don’t want to microwave it again? Enjoy it cold—seriously. Some people love the chilled brownie texture it takes on the next day. Add a scoop of ice cream and it’s basically a chocolate sundae.
Whether you’re eating it fresh, saving some for later, or prepping two mugs for you and someone lucky, this recipe gives you options. That’s the beauty of this fast, flexible chocolate dessert—it fits real life.
What to Serve with Your Chocolate Mug Cake
Pairing Ideas: Drinks and Add-Ons
Want to turn your microwave mug cake into a mini dessert celebration? Pair it with the right drink or treat to elevate the entire experience.
Here are some cozy, satisfying combos that work every time:
Drinks That Hit the Spot
- Cold milk – A classic choice. Whether you use dairy or oat milk, it pairs perfectly for a comforting finish.
- Hot coffee or espresso – The bitterness of coffee balances the richness of the chocolate.
- Chai latte – Warm spices contrast beautifully with sweet cocoa.
- Matcha or green tea – Earthy, refreshing, and a great contrast to the cake’s sweetness.
Hosting? Serve the mug cake with a fancy spoon and a warm drink in a matching mug. Easy upgrade, major vibe.
Turn It Into a Dessert for Two
Mug cake doesn’t have to mean solo dessert. You can easily double the recipe and make two mugs for date night, movie night, or just sharing with someone who deserves it.
Want to get creative? Try these pairing ideas for a full dessert plate:
- Half-mug cake + scoop of ice cream + drizzle of syrup
- Mug cake crumbled over yogurt or whipped coconut cream
- Serve alongside fruit slices like bananas, strawberries, or pears
You could even build a DIY mug cake bar at a gathering. Set out toppings like:
- Mini chocolate chips
- Toasted nuts
- Whipped cream
- Sprinkles
- Fresh berries
- Cinnamon sugar
Let everyone customize their own masterpiece—it’s interactive, delicious, and zero stress.
This isn’t just a dessert—it’s a mood. And with the right sides and sips, your chocolate mug cake goes from “quick fix” to intentional indulgence.
FAQs – Chocolate Mug Cake
Can I make a chocolate mug cake without eggs?
Yes! In fact, this chocolate mug cake recipe is completely egg-free. Eggs can make mug cakes rubbery or overly dense when microwaved. Instead, this recipe uses baking soda and milk to give it lift and moisture—no egg required.
Why is my mug cake rubbery or chewy?
A rubbery texture usually means the mug cake was overcooked or overmixed. Microwave cooking happens fast—so even 10–15 extra seconds can dry it out. Mix the batter just until combined and cook for 60 to 75 seconds max, depending on your microwave.
What’s the best mug to use for mug cake?
Choose a microwave-safe mug that holds at least 12 ounces. Ceramic or stoneware mugs with tall, straight sides work best. Avoid mugs with metallic paint or small capacity, which can lead to overflow or uneven cooking.
Can I use water instead of milk in mug cake?
Yes, you can substitute water, but the cake will be less rich and creamy. If you’re out of milk, adding a teaspoon of neutral oil or dairy-free creamer to the water can help maintain moisture and flavor.
Is it safe to microwave flour?
Yes, it’s safe as long as the flour is cooked through. This mug cake is microwaved thoroughly during the cooking process, which eliminates any concerns about raw flour. Just make sure your cake is hot all the way through before eating.
How many calories are in a chocolate mug cake?
A typical chocolate mug cake made with the base ingredients (flour, cocoa, sugar, milk, oil) has about 350 to 400 calories, depending on the exact measurements and mix-ins like chocolate chips or toppings. Using plant-based milk or skipping the chocolate chips can slightly reduce calories.
Conclusion: Chocolate Mug Cake Is the Sweet Shortcut You’ll Keep Craving
There’s something truly satisfying about a dessert that’s fast, foolproof, and totally indulgent—and this chocolate mug cake hits every mark. Whether you’re making it for a quick fix, a cozy night in, or even as a surprise for someone special, it’s the perfect single-serve dessert that never disappoints.
With just a mug, a microwave, and a few pantry staples, you’re minutes away from pure chocolate comfort. And once you try it, you’ll be making this on repeat—trust me, I’ve been there.

Chocolate Mug Cake
Ingredients
Equipment
Method
- Add dry ingredients to a microwave-safe mug and stir to combine.
- Stir in milk, oil, and vanilla extract until smooth.
- Fold in chocolate chips if using.
- Microwave on high for 60–75 seconds.
- Let cool slightly, then top with ice cream or whipped cream if desired.
Notes
- Don’t overmix the batter—stir until just combined.
- Every microwave is different. Start with 60 seconds, then add 10-second intervals as needed.
- For a vegan version, use plant-based milk and dairy-free chocolate chips.
- A splash of espresso or a pinch of cinnamon enhances the chocolate flavor.
- Serve warm for best texture.